Audience Sync is an export feature that we see on Sitecore CDP. This is a helpful tool when you would need segmented data to be used on an external platform/destination such as social media platform to drive an advertising campaign. Audience sync can also help reduce imprudent prospecting, create exclusion lists and remove customers from procuring campaigns.
Create Audience Sync Connection
This step is self-explanatory which is just navigating to connections and filling details as prompted. You can refer to the documentation for step by step instruction
Create Audience Sync template
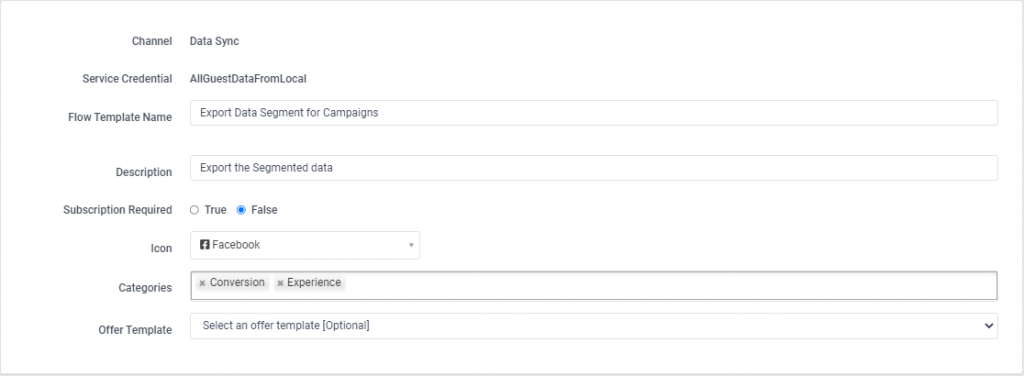
In the Navigation point under Library, you will find the Audience Sync Templates option and then you select “Create Template“. Once you select it you will see Service Credentials selection options (You can see Service credentials created for your instance in the first step), For example in my case, I select “AllGuestDataFromLocal” .

Once you are done with the selection you will see Create Template screen where you have some fields which you would need to configure.
- General Settings
- Flow Template Name : Provide Intitutive name for this field as this will show up on selection when you create Audience sync in next steps.
- Subscription Required : Select False
- Icon : Icon which users see during template usage, so select from dropdown list which suits needs.
- Categories : Apply relevant categorie(s) which shows up as you type in.
- Offer Template: This is optional and for our scenario we will not select it.
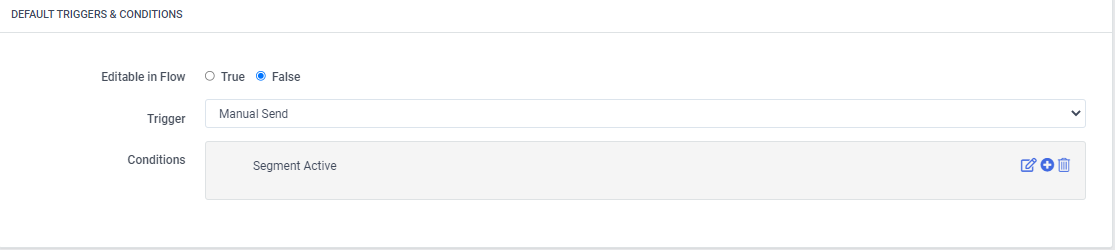
- Default triggers and conditions
- Editable in flow field : make this option as false, this restricts users from editing template while creating an audience sync
- Trigger : You have two ways of trigger, Manual or Schduled batch
- Conditions : This is optional but in our case we will provide condition as “Segment Active”, which shows up on hitting ‘+’ icon.
- Default Configuration
- Editable in flow field : Set as TRUE, which is different from previous section.Setting TRUE enables user who creates audience sync to add and remove attributes they want to export to file.
- Notification Email : Provide with contact email address where CDP can send notification email once batch process is finished.
- Notification Credentials : Optional Field so we need not select.
- Content-Type : You can choose either CSV or JSON type based on your needs
- File Entry : As we all know CDP drives dynamic content using Freemarker text , hence file entry editor provides access to list of dynamic free markers (Segment,Session,guest and order) which you can use to export.
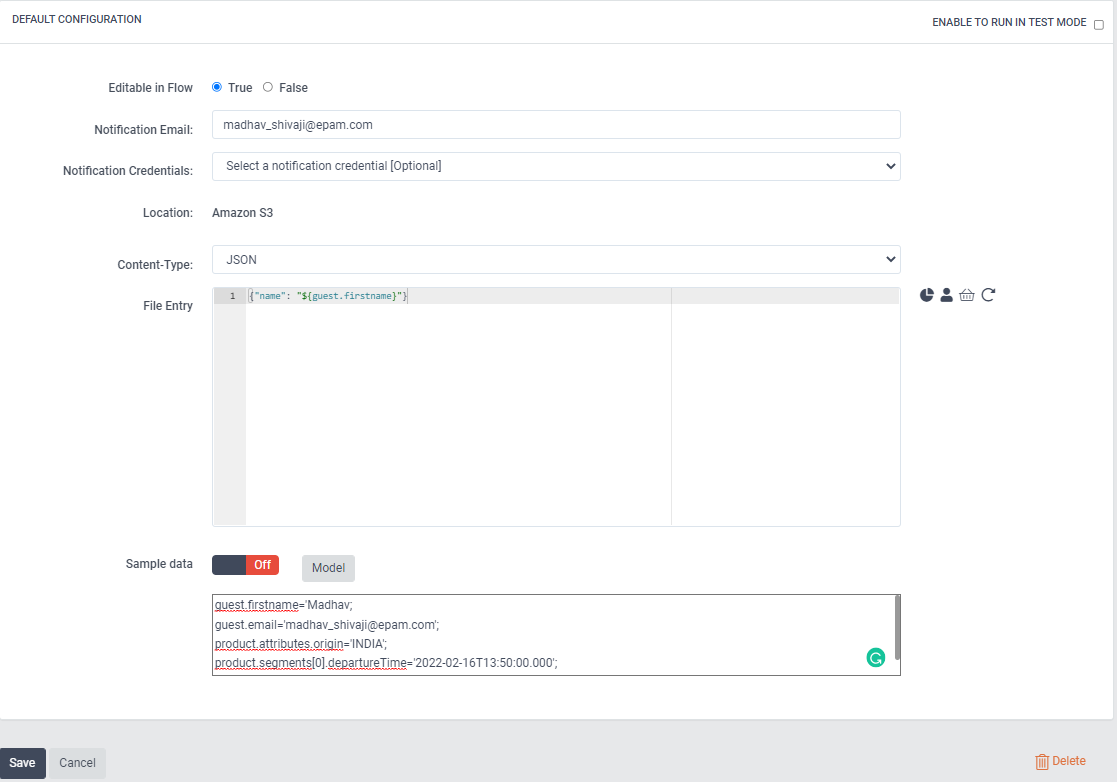
You also can click on Model to see an example of what your selected attributes look like on export. Once you are done you hit Save.
Create Audience Sync
In this Step, we go to Audience Sync in Navigation Pane and Hit Create Sync. Once you do that you will be prompted with a list of Templates that are available. Let us select the template which we created in the previous step “Export Data Segment for Campaigns” as shown below.

Now you can verify that Flow Template is the same as the one which we selected and service credential has been inherited. Let’s provide a meaningful name for sync and also select the Segment field as one of the segments available. We can keep everything else without change. We do see Reporting section where we choose which type of reporting do we need for sync. For our scenario, we select Engagement (The other option would be Revenue by Default) and hit SAVE.(Snapshot below)

Once you have saved you will have Audience Sync Created and remains Inactive, You can edit it again, and on the Save button, you will see a dropdown where you can select “Send Now” which makes it active.

If you again click on sync created you can now only Duplicate and won’t be able to edit. From here sync will be in progress and once executed you will have it exported. You will also get a notification email once execution is completed. Finally, Sync looks as below snapshot

After ten mins I did receive an email that my export is ready along with instructions on What to do next.
- Provided me Dynamic Link where flow output is present.
- Using Postman , we need to send a GET request containing the API link to get signed URL which is in response .(Check batch flows output documentation for more details)
- Copy Signed URL in a browser to download to your system.